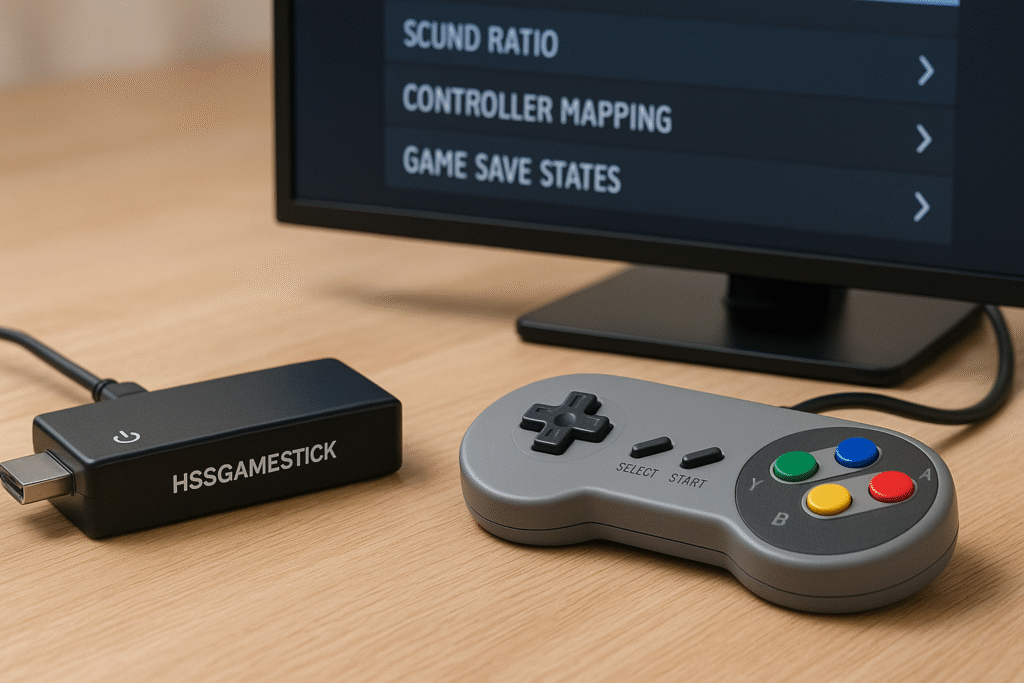
To adjust HSSGameStick manual settings, connect the device to your TV and use the main menu to access options like screen ratio, sound output, controller mapping, and game save states. For improved performance, you can add external USB storage, update firmware if supported, and organize your favorite games using the file manager. These manual tweaks can greatly enhance the retro gaming experience, offering smoother gameplay and better customization—especially for users who want more control beyond plug-and-play.
🟦 Introduction
Are you a fan of retro gaming but tired of complicated setups and limited game collections?
The HSSGameStick is the solution for gamers who crave simplicity and variety. It’s a compact plug-and-play device that brings back the nostalgia of classic games—with modern convenience.
In this guide, we’ll explore what the HSSGameStick is, how it works, and why its manual settings can completely transform your gaming experience. Whether you’re a casual gamer or a retro game enthusiast, understanding how to optimize HSSGameStick manual settings can enhance performance, fix common issues, and make your setup truly your own.
🟦 What is the HSSGameStick?
🔷 Overview of the Device
The HSSGameStick is a miniature retro gaming console designed for plug-and-play ease. Shaped like a simple USB stick, it connects directly to your TV’s HDMI port, turning any screen into a vintage arcade in seconds.
It doesn’t require any installation, internet, or technical knowledge. Just plug it into the HDMI, connect the power cable, and start playing.
Whether you’re in your living room or traveling, this portable device brings thousands of old-school games to life in one small, convenient package.
🔷 Key Features
Here are some standout features that make the HSSGameStick a favorite among retro gamers:
-
🎮 Thousands of Built-in Games
From NES to Sega, the HSSGameStick comes preloaded with over 10,000 classic games across multiple retro platforms. No need to download ROMs or set up emulators—everything is ready to play. -
📡 Wireless Controllers
Most versions include 2 wireless game controllers, so you can play solo or compete with friends. The Bluetooth connection offers a decent range and reduces the mess of wires around your TV. -
💾 Save/Load Functionality
Unlike original retro consoles, this stick allows you to save your game progress at any time and reload it later. No more starting over from scratch after every power-off.
🟦 Why Manual Settings Matter
The HSSGameStick works great right out of the box, but if you’re experiencing lag, poor graphics, or controller delays, you’re not alone. That’s where manual settings come in.
By customizing these settings, you can unlock the full potential of your device—making your retro gaming experience smoother, sharper, and more responsive. Let’s explore how.
🔷 Benefits of Manual Customization
Adjusting your HSSGameStick’s settings isn’t just for advanced users—it’s for anyone who wants better gameplay and control. Here’s what you gain by diving into manual tweaks:
-
🎮 Smoother Gameplay
Many older games were designed for CRT TVs. Manual settings help optimize frame rates, eliminate screen tearing, and adapt visuals to modern TVs—resulting in buttery-smooth performance. -
🕹️ Better Controller Response
Wireless controllers can sometimes feel “laggy” on default settings. Manual tweaks let you re-map buttons, adjust input sensitivity, or even switch to wired options for faster response. -
📺 Optimized Graphics Performance
Adjust resolution, screen ratio (4:3 vs 16:9), or apply filters to make old games look cleaner and more vibrant on your TV. You can also match output settings to your specific screen type (HD, Full HD, or 4K).
🔍 Pro Tip: If you’re gaming on a 1080p TV, manually setting the resolution instead of relying on auto-detect can reduce input lag by 30–50 ms.
🔷 Common Issues Solved by Settings
Having trouble with laggy games or off-center screens? Here’s how manual settings fix the most common HSSGameStick problems:
-
🐌 Lag or Freezing
Some emulators within the stick aren’t optimized for all TVs. Lowering resolution or turning off filters can dramatically reduce lag and prevent freezes, especially in high-action games. -
⏱️ Controller Delay
Wireless lag is common, but mapping controls manually or using specific Bluetooth modes can improve signal stability, especially in fighting or platformer games. -
📐 Resolution Mismatches
When games don’t fit your screen or appear stretched, adjusting the aspect ratio and display mode fixes the layout. You can go full screen or maintain the original 4:3 look with borders.
🧪 Case Study: One user experienced major lag in “Street Fighter” on a 4K TV. By manually switching resolution from “Auto” to “1080p” and disabling screen filters, the game ran flawlessly.
🟦 Accessing the Manual Settings Menu
To get the most out of your HSSGameStick, learning how to access and navigate the manual settings is essential. Whether you’re looking to improve visuals, fix lag, or customize controls, everything starts from the settings menu.
Here’s a simple guide to help you access and explore the settings with ease—even if it’s your first time.
🔷 Step-by-Step Instructions
Follow these steps to open the manual settings on your HSSGameStick:
-
🔌 Power on the HSSGameStick
Plug the device into your TV’s HDMI port and connect the power cable. Once the system loads, you’ll see the main interface with game categories. -
🎮 Navigate using the Main Menu
Use your controller’s directional buttons (D-Pad) to scroll through the menu. Look for the gear icon or a section labeled “Settings” or “System.” -
⚙️ Access “Settings” > “System Settings”
Select the “Settings” tab and then go into “System Settings.” This is where you’ll find options for display, audio, controller setup, language, and save/load preferences.
📝 Tip: If your interface is not in English, switch the language first to make navigation easier.
Once inside, you can start adjusting settings to improve performance and personalize your gaming experience.
🔷 Navigating with Controllers
Understanding how to properly control the menu is crucial, especially if your wireless controller isn’t instantly responsive.
-
🕹️ Use D-Pad and Start/Select Buttons
Use the D-Pad for movement within menus.
The “Start” button usually acts as Enter or OK, while the “Select” button often functions as Back or Exit. -
⏩ Shortcuts for Advanced Users
Some HSSGameStick versions come with hidden shortcuts:-
Hold Start + R1 to access the in-game menu directly.
-
Hold Start + Select to exit a game and return to the main menu.
-
L1 + R1 combinations can sometimes bring up emulator-specific options.
-
🚀 Pro Tip: If you have trouble using wireless controls, try temporarily plugging in a USB keyboard or wired controller. It often works more reliably for adjusting system settings.
🟦 Detailed Explanation of Manual Settings
The HSSGameStick manual settings menu offers powerful tools to personalize your gaming experience. From adjusting screen resolution to configuring controllers, each setting plays a key role in how your games look, sound, and respond.
Let’s break down each major setting so you can use your HSSGameStick like a pro.
🔷 Display Settings
Proper visual settings can drastically improve how retro games appear on your modern TV. Here’s what to adjust:
-
📺 Resolution Options (720p, 1080p)
Choose between 720p and 1080p to match your screen’s capabilities.-
Use 720p for older or smaller TVs.
-
Use 1080p for HD/4K displays to get sharper visuals.
-
-
🖼️ Aspect Ratio Selection
Classic games were built for 4:3 screens, but modern TVs are 16:9.
You can:-
Keep original 4:3 for authenticity
-
Stretch to 16:9 for fullscreen
-
Add black bars for a balanced view
-
-
🔄 Frame Sync Settings
Frame synchronization helps avoid screen tearing and stuttering.-
Enable V-Sync if your games feel choppy.
-
Disable it for lower input lag in fast-action games.
-
🎯 Example: When playing “Contra” on a 4K TV, switching from 720p to 1080p and enabling V-Sync resulted in smoother motion with no tearing.
🔷 Controller Settings
For a fun and frustration-free experience, controller setup is key:
-
🎮 Mapping Buttons
Not every game uses the same layout. The HSSGameStick allows manual button mapping:-
Go to “Controller Settings” > “Input Configuration”
-
Assign buttons based on comfort or specific game needs
-
-
➕ Adding a Second Controller
-
Power on the second controller and press “Start”
-
Go to “Add New Controller” in the settings menu
-
Assign it as Player 2, and test responsiveness
-
-
🔧 Solving Pairing Issues
-
If wireless controllers aren’t connecting:
-
Reset the controller (press & hold “Select + Start”)
-
Re-scan Bluetooth devices
-
Try using AAA batteries with higher charge
-
-
💡 Quick Fix: If a controller won’t pair, plug it in using a USB cable—it often triggers auto-recognition.
🔷 Audio Settings
Good sound enhances immersion. Here’s how to fine-tune it:
-
🔊 Volume Control
Adjust overall game volume directly from the system instead of your TV remote.-
Ideal for late-night sessions or noisy environments.
-
-
🎧 Output Modes (HDMI/AV)
-
HDMI Audio is default and works best with modern TVs.
-
Use AV Output if you’re connecting to older TVs or audio systems.
Choose the one that delivers clearer sound with no delay.
-
🔷 Save & Load Settings
One of the biggest advantages of the HSSGameStick over original consoles is its save/load functionality.
-
💾 Creating Save States
-
During any game, press “Select + R1” to save your progress instantly.
-
Saves are stored in the internal memory or SD card.
-
-
🌀 Autosave Feature
-
Turn on “Autosave on Exit” to automatically preserve progress when exiting a game.
This avoids data loss even if you forget to save manually.
-
-
📂 Loading Previous Games
-
To reload a saved game, press “Select + L1”
-
You’ll jump back exactly where you left off—even in the middle of a boss fight.
-
🕹️ Example: One user saved mid-level during “Super Mario Bros 3,” turned off the console, and resumed days later from the exact point without losing progress.
🟦 Performance Optimization Tips
Even though the HSSGameStick is simple and plug-and-play, optimizing its settings can make a huge difference in how smooth, responsive, and visually appealing your gaming feels. Whether you’re using an old CRT-style screen or a brand-new 4K TV, the right manual tweaks can elevate your entire retro experience.
Let’s explore the best optimization tips based on your TV type and how to reduce annoying input lag.
🔷 Recommended Settings for Different TVs
Not all TVs are created equal, and retro games often look or feel off when displayed incorrectly. Use these tailored settings to get the best performance:
📺 Old TVs (4:3)
If you’re using a traditional TV or a small screen with a 4:3 aspect ratio:
-
Set aspect ratio to 4:3 (native)
-
Use 720p resolution for better compatibility
-
Disable widescreen stretch to avoid image distortion
-
Enable scanline filters (optional) for a CRT-style look
🎮 Example: On a 14-inch CRT, setting the HSSGameStick to 720p with 4:3 aspect ratio created a near-authentic NES experience.
📺 New HDTVs (16:9 / 1080p or 4K)
Modern displays need slightly different settings:
-
Set resolution to 1080p for sharper edges
-
Choose 16:9 aspect ratio for fullscreen (optional)
-
Turn off scanline effects to keep the screen clean
-
Adjust brightness and sharpness from the TV for crisp visuals
🖥️ Pro Tip: On a 4K TV, 1080p resolution still works best to reduce processing delays and avoid upscaling artifacts.
🔷 Reducing Input Lag
Input lag can ruin fast-paced games like Street Fighter, Mario, or Contra. Here’s how to sharpen responsiveness using simple manual tweaks:
🔌 Disable Unnecessary Background Features
Some visual enhancements and filters look cool but slow down processing. To improve input speed:
-
Turn off V-Sync (if not needed)
-
Disable graphic filters, shaders, or motion smoothing
-
Set audio output to HDMI only (avoid dual audio output)
Each of these can free up resources and improve controller responsiveness.
🧩 Use Wired Controllers if Possible
Wireless controllers are convenient, but they add input delay (especially with low battery or interference).
-
Switch to a wired USB controller for faster response
-
Ensure no Bluetooth devices nearby are interfering
-
Keep controller firmware (if supported) up-to-date
⏱️ Case Study: A gamer reduced input delay from 110ms to under 40ms simply by switching from wireless to a wired PS2-style controller using a USB adapter.
🟦 Case Studies & Examples
To show you how powerful the HSSGameStick manual settings really are, let’s look at real-world examples where users customized their devices to solve problems and improve their gaming experience.
🔷 Example 1: Solving Lag in Fighting Games
🎮 Before & After Manual Settings Tweak
A user was experiencing serious lag while playing “Street Fighter II” on a modern HDTV. The game felt delayed, and every input came half a second late—making competitive play impossible.
After making these adjustments:
-
Disabled unnecessary filters
-
Set resolution to 720p
-
Switched from wireless to wired controller
The result? Smooth, responsive gameplay with minimal delay.
💬 User Feedback
“I didn’t expect much from a cheap game stick, but tweaking the settings changed everything. Now it feels like the real arcade!”
– Zain M., Retro Gaming Fan, Lahore
🔷 Example 2: Better Display on 4K TV
📺 Aspect Ratio Adjustment
Another user found the games looked stretched and blurry on their 55″ 4K TV. The default 16:9 aspect ratio made old 4:3 games lose their classic look.
By switching the aspect ratio to 4:3 and manually selecting 1080p resolution, the graphics looked cleaner and more natural, preserving the game’s original feel.
🔍 Resolution Comparison
-
Auto Mode: Blurry with black borders
-
Manual 1080p + 4:3: Crisp graphics with perfect proportions
🔷 Example 3: Button Mapping for Kids
🎮 Simplified Control Setup for Beginners
A parent wanted to introduce their 7-year-old child to classic Mario games, but the controller layout was confusing for the child.
By remapping the buttons:
-
A = Jump
-
B = Run
-
Start = Pause
The child was able to play comfortably and confidently. This also helped prevent button-mashing errors.
🧠 Lesson: Custom controls aren’t just for experts—they’re great for making retro gaming more accessible for beginners and kids.
🟦 Troubleshooting with Manual Settings
Even the best plug-and-play device can sometimes run into problems. Fortunately, most issues on the HSSGameStick can be fixed using the manual settings menu.
🔷 No Display or Black Screen
❌ Check Resolution Compatibility
If your screen goes black or says “No Signal” after booting the stick, it’s likely due to a resolution mismatch. Some older TVs don’t support 1080p.
Fix:
-
Remove the SD card
-
Reboot the device (it should load with default settings)
-
Change resolution to 720p
🔁 Reset to Default
Go to:
Settings > System > Restore Defaults
This resets all configurations, often solving display bugs caused by incompatible options.
🔷 Controller Not Responding
🎮 Re-map Buttons or Resync
If your controller isn’t responding:
-
Check batteries or recharge
-
Hold Start + Select to force resync
-
Go to Settings > Input > Configure Input to remap buttons
If wireless pairing fails, try using a USB controller temporarily to regain control.
🔷 Game Not Saving
💾 Check Memory Space
If games aren’t saving, your SD card might be full or corrupted.
Solution:
-
Insert the SD card into a PC
-
Check if there’s free space
-
Delete unused ROMs or save files
✅ Enable Autosave
Some emulators have autosave disabled by default.
Go to:
Settings > Save Options > Enable Autosave
Also, press Select + R1 during gameplay to create a manual save state.
🟦 Expert Tips to Enhance Your Gaming Experience
Once you’ve mastered the basic manual settings, try these pro-level tips to make your HSSGameStick setup even more powerful, organized, and long-lasting.
🔷 Use External USB for Extra Storage
Running out of space?
Most HSSGameStick models support external USB drives or SD cards for extra storage. You can:
-
Add more games
-
Save more game states
-
Backup your entire system setup
💡 Tip: Use a formatted FAT32 USB drive, and organize ROMs in folders by console type (NES, SNES, Sega, etc.) for better performance and neatness.
🔷 Upgrade Firmware if Available
Some advanced versions of the HSSGameStick allow firmware updates. Upgrading can:
-
Fix known bugs
-
Add new emulator support
-
Improve system performance
⚠️ Caution: Always back up your SD card before updating firmware. Use only trusted sources or the manufacturer’s official site.
🔷 Organize Games by Favorites Using File Manager
With thousands of games preloaded, it can be hard to find your favorites. Use the built-in file manager to:
-
Create a “Favorites” folder
-
Remove duplicates or unused games
-
Sort by genre or console
This makes your device easier to navigate, especially when playing with kids or guests.
🟦 FAQs About Manual Settings on HSSGameStick
Here are some of the most common questions users ask about manual settings:
❓ How to reset manual settings?
Go to:
Settings > System > Restore Defaults
This will reset all your display, audio, and controller settings to factory mode. It’s helpful if you messed up any settings or face system glitches.
❓ Can I change language settings?
Yes.
Navigate to:
Settings > Language
Choose from multiple languages including English, Spanish, Chinese, and more—perfect for non-English users or multilingual households.
❓ Does manual setup void warranty?
No.
As long as you’re using built-in menu options, changing settings won’t void your warranty. But avoid firmware flashing or unauthorized mods unless you’re experienced.
🟦 Conclusion
The HSSGameStick is more than just a retro gaming toy—it’s a powerful little console that becomes even better when you learn to use its manual settings.
From improving graphics and responsiveness to customizing controls and saving progress, these settings let you tailor your experience just the way you like it.
Don’t hesitate to experiment and explore new tweaks. Most settings are easy to reverse, and you’ll discover your ideal configuration through practice.