
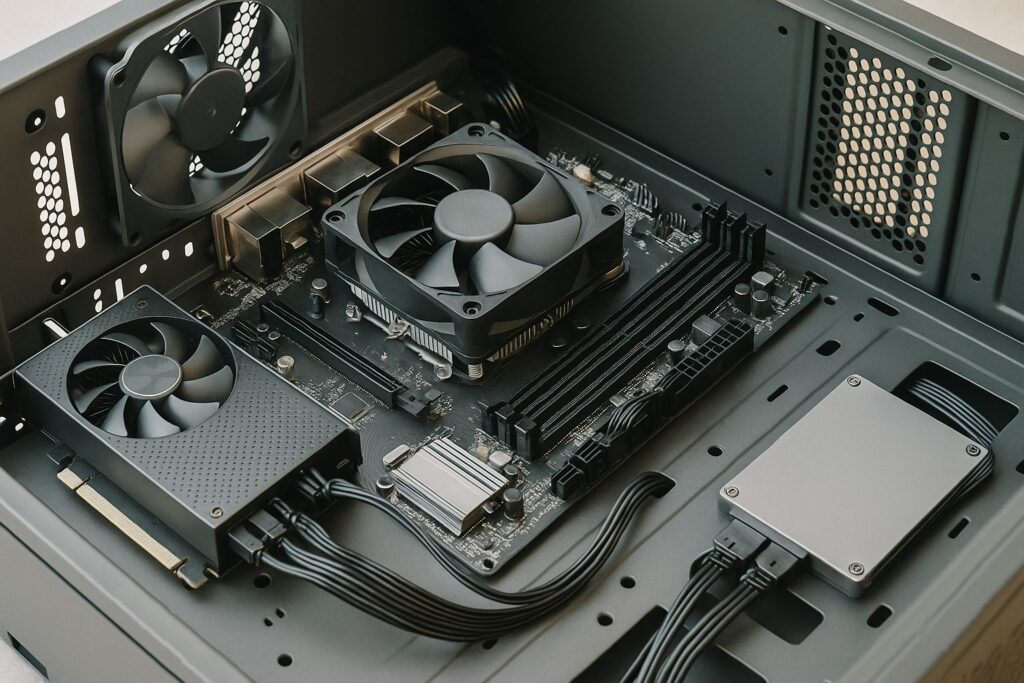
To assemble PC hardware, start by installing the CPU, RAM, and cooler onto the motherboard. Then mount the motherboard in the case, connect the PSU, and install storage and GPU. After completing all connections, perform a system check and boot into BIOS to verify installation.
Introduction
Building your own PC might seem intimidating—but it’s easier than you think. In today’s fast-evolving digital world, knowing how to assemble PC hardware is not only a valuable skill—it’s a game changer. Whether you’re a tech enthusiast, gamer, student, or someone who simply wants more control over their computer’s performance, this guide is your go-to resource.
Why is this important? Because pre-built systems often come with unnecessary components, limited upgradability, and higher costs. Assembling your own PC ensures customization, cost-efficiency, performance optimization, and most importantly, the confidence to upgrade or troubleshoot independently in the future.
In this comprehensive, easy-to-follow article, you’ll learn everything from selecting compatible components to installing each part step by step—all explained in simple terms, supported by expert tips and real-world advice. Whether it’s your first time or you need a refresher, this guide ensures you’ll walk away with confidence and clarity.
Pre-Build Preparation
Before diving into the physical assembly of your PC, proper preparation is essential. A successful build begins long before the first screw is tightened. This stage ensures that every component works harmoniously and that your build process is smooth, safe, and stress-free.
🔹 1. Research and Select Compatible Components
-
Use compatibility tools:
Websites like PCPartPicker help you check if your chosen parts—motherboard, CPU, RAM, GPU, and PSU—are compatible. -
Set your performance goals:
Are you building a PC for gaming, video editing, software development, or general use? Define your goals to avoid overspending or underperforming. -
Mind your budget:
Strike a balance between cost and performance. For example, a Ryzen 5 CPU paired with an RTX 3060 can handle both gaming and productivity at a mid-range budget.
💡 Pro Tip: Always check if your motherboard BIOS supports your CPU out of the box—especially with AMD processors.
🔹 2. Gather Necessary Tools and Set Up a Workspace
-
Tools you’ll need:
A Phillips-head screwdriver, anti-static wrist strap, and a flashlight or headlamp for tight spaces. -
Organize your workspace:
Use a large, clean, flat surface—preferably a wooden or non-conductive table. Avoid carpeted areas to minimize static buildup. -
Arrange your components:
Lay out all your parts—motherboard, case, PSU, etc.—to make sure nothing is missing. Double-check the contents of each box, including screws and manuals.
🔹 3. Ensure Safety Through Anti-Static Measures
-
Use an anti-static wrist strap:
This grounds your body and prevents static discharge, which can damage sensitive components like the CPU or RAM. -
Avoid static-prone surfaces:
Work in areas without rugs or carpet. Always handle components by their edges. -
Discharge static manually:
If you don’t have a strap, touch a metal object connected to the ground (like a plugged-in PSU case) before handling each component.
⚠️ Electrostatic discharge (ESD) can silently kill hardware—take it seriously even if the risks seem invisible.
By laying a strong foundation with careful planning, compatible parts, and a static-free environment, you’re setting yourself up for a smooth, confident PC building experience.
Installing the Processor (CPU)
The CPU (Central Processing Unit) is the heart of your computer. Installing it correctly ensures optimal performance and prevents costly damage. This step requires careful attention, but with the right guidance, it’s straightforward even for beginners.
🔹 1. Locate the CPU Socket on the Motherboard
-
Identify the socket type:
Intel and AMD CPUs use different sockets (e.g., LGA 1700 for Intel or AM5 for AMD). Make sure your motherboard matches your CPU model. -
Open the CPU socket cover:
Carefully lift the small metal retention arm or latch on the socket. This reveals the delicate pins or contact pads underneath. -
Align the socket orientation:
Use the triangle marker on the CPU and the socket corner to match their orientation. This ensures the processor is placed correctly.
🧠 Remember: Never touch the pins or pads directly. Oils from your fingers or bending a pin can damage the CPU or board.
🔹 2. Install the CPU Properly
-
Gently place the CPU into the socket:
Do not apply force. If aligned properly, the CPU will drop into place naturally. -
Secure the CPU:
For Intel CPUs, lower the metal arm back into place to secure the CPU. For AMD CPUs, gently close the latch or locking mechanism. -
Check for a firm fit:
The CPU should sit flush with the socket surface without wiggling.
⚠️ DO NOT press or twist the CPU into the socket—it could break pins or damage the board.
🔹 3. Apply Thermal Paste and Install CPU Cooler
-
Apply thermal paste (if not pre-applied):
A small pea-sized dot in the center of the CPU is enough. Spreading manually is not required. -
Attach the CPU cooler:
Whether it’s an air cooler or liquid AIO, follow the manufacturer’s instructions. Secure it evenly using a cross pattern if screws are used. -
Connect the fan cable:
Plug the cooler fan into the CPU_FAN header on the motherboard for proper cooling control.
💡 Note: Some coolers come with pre-applied thermal paste—check before adding more.
Proper CPU installation ensures your computer can run smoothly and efficiently without overheating or system errors. Take your time—precision matters here more than speed.
Installing the Motherboard
The motherboard is the central hub of your PC, connecting all components together. Proper installation is essential to ensure everything functions correctly and avoids electrical shorts or hardware failures.
🔹 1. Prepare the PC Case and Install Standoffs
-
Check case compatibility:
Make sure your case supports your motherboard’s form factor (e.g., ATX, Micro-ATX, Mini-ITX). -
Locate standoff holes:
Identify the correct mounting holes in the case that align with your motherboard layout. These are usually labeled inside the case. -
Install brass standoffs:
Screw standoffs into the case at the appropriate positions to elevate the motherboard, preventing contact with the metal case, which could cause shorts.
🔧 Pro Tip: Use the included standoff tool or a small socket wrench to ensure standoffs are tight but not over-torqued.
🔹 2. Install the I/O Shield
-
Snap the I/O shield into place:
The I/O shield comes with the motherboard and fits into the rectangular opening at the back of the case. -
Ensure it’s flush:
The shield must sit firmly with no sharp edges sticking out. It protects ports and helps guide the motherboard into position.
⚠️ Important: Install the I/O shield before mounting the motherboard—it cannot be added later without removing the board.
🔹 3. Mount the Motherboard into the Case
-
Align the board with the standoffs and I/O shield:
Line up the motherboard so its ports fit through the I/O shield and holes match the standoffs. -
Secure with screws:
Use the screws provided with the case—not too tight, just snug. Avoid overtightening to prevent cracking the board. -
Double-check alignment:
All ports should be accessible, and there should be no bending or tension on the board.
💡 Tip: Count the screws—each standoff should have a screw installed for even support and grounding.
Installing the motherboard is a crucial moment in your build. Done correctly, it forms a stable and safe foundation for the rest of your hardware. Precision and care here will ensure easier installation of future components.
Installing RAM (Memory)
RAM (Random Access Memory) is essential for your PC’s performance, allowing it to handle multitasking and run applications smoothly. Installing RAM is one of the easiest steps in building a PC, but proper placement is critical for optimal performance.
🔹 1. Locate the RAM Slots on the Motherboard
-
Identify the DIMM slots:
These are long, narrow slots usually located to the right of the CPU socket. Most motherboards have 2 or 4 RAM slots, labeled as A1, A2, B1, B2. -
Check your motherboard manual:
The manual will show the recommended RAM configuration—especially important when using two sticks for dual-channel mode. -
Understand the color coding:
RAM slots often alternate in color. Insert RAM in the same-colored slots (e.g., A2 and B2) for best performance.
💡 Dual-channel configuration significantly boosts memory bandwidth. Always install RAM in the correct paired slots.
🔹 2. Prepare RAM for Installation
-
Check the notch position:
Each RAM stick has a small notch that matches a key in the motherboard slot, ensuring correct alignment. -
Hold by the edges:
Avoid touching the gold contacts or circuitry. Handle RAM modules carefully to avoid electrostatic damage. -
Unlock the slot latches:
Push the plastic locking tabs outward on both sides of the RAM slot before inserting the stick.
🔹 3. Install RAM Modules Securely
-
Align and press firmly:
Insert the RAM straight down into the slot with even pressure on both ends. The locking tabs will click into place when it’s fully seated. -
Verify a solid connection:
Check that both latches are locked and the RAM is snugly fitted—no wiggle or gaps. -
Test for correct installation:
Later during the first boot, your system BIOS/UEFI should detect the installed RAM. If not, recheck seating and slot choice.
⚠️ Never force RAM into a slot backward. If it doesn’t go in easily, double-check the orientation.
With your RAM properly installed, your system is now equipped to handle active processes, programs, and multitasking. This is a quick but crucial step in ensuring your PC performs to its full potential.
Installing Storage Drives (SSD/HDD)
Your storage drive—whether an SSD (Solid State Drive) or HDD (Hard Disk Drive)—is where your operating system, software, and files reside. Installing it correctly ensures fast boot times, smooth performance, and reliable data storage.
🔹 1. Choose the Right Type of Drive
-
2.5″ SATA SSD / HDD:
These drives use SATA data and power cables. Common for both SSDs and traditional hard drives. -
M.2 NVMe SSD:
These compact drives plug directly into the M.2 slot on your motherboard and offer blazing-fast performance. -
3.5″ HDD:
Typically used for bulk storage. Requires a larger drive bay and dedicated SATA power and data cables.
⚡ For speed and reliability, choose an M.2 NVMe SSD as your primary drive and an HDD for secondary storage if needed.
🔹 2. Mount the Drive in the Case
-
For SATA SSD/HDD:
Use the drive bays or sleds inside your case. Slide the drive into place and secure it with screws. -
For M.2 SSD:
Locate the M.2 slot on the motherboard. Align the gold contacts, insert the drive at a slight angle, then press it flat and screw it down with the included standoff.
🔧 Some cases have tool-less mounting trays for easy SSD installation—check your case documentation.
🔹 3. Connect the Drive to Power and Data
-
For SATA drives:
-
Connect a SATA data cable from the motherboard to the drive.
-
Attach a SATA power cable from the power supply.
-
Use available SATA ports like SATA_0, SATA_1 for primary drives.
-
-
For M.2 NVMe SSDs:
-
These require no cables—they get both power and data from the motherboard directly.
-
-
Cable management tip:
Keep your cables neat and routed through case grommets or behind the motherboard tray for better airflow.
With your storage devices installed, your PC is ready to store and run the operating system and applications. A well-chosen and properly installed SSD can dramatically improve overall system performance.
Get [url=https://www.fidetec.com/7sim/]Temporary phone numbers[/url] for convenient and secure registration on various services.
Utilizing these phone numbers helps users safeguard their personal numbers from potential spam and unwanted communication.
На сайте [url=https://moscowframe.ru/]спортивная фотосессия[/url] вы можете заказать услуги профессионального фотографа в Москве.
самые яркие моменты жизни в столице России. Профессиональный фотограф в Москве поможет создать невероятно красивые и эмоциональные фотографии . Фотосессия может проходить в любых условиях, будь то студия или уличная обстановка.
Фотография – это не только запечатление моментов, но и искусство создания незабываемых впечатлений. Фотограф в Москве, имеющий высокий уровень мастерства и творческий подход , может предложить разработку персонализированного плана фотосессии .
Существует много разных типов фотосессий, каждая со своим уникальным стилем и атмосферой . Фотосессия для свадьбы, дня рождения или другого значимого события требует специфического плана и подготовки .
Фотограф в Москве, специализирующийся на портретной, модной или художественной фотографии , может предложить индивидуальные услуги и персонализированную поддержку. Фотосессия может быть спонтанной и непредсказуемой или тщательно спланированной .
Подготовка к фотосессии – это ключевой этап, на котором определяется концепция и задачи фотосессии. Фотограф в Москве поможет выбрать подходящую локацию и время суток .
Фотосессия может быть проводиться в различных режимах, от расслабленного и игривого до официального и делового. Фотограф в Москве, имеющий большой опыт работы с клиентами , может предложить высокое качество фотографий и профессиональную обработку .
Результат фотосессии – это потрясающие и эмоциональные изображения. Фотограф в Москве, имеющий способность работать в разных условиях и ситуациях, может предложить индивидуальный подход и персонализированную поддержку .
Фотосессия в Москве – это уникальный шанс создать удивительные и неповторимые фотографии . Фотограф в Москве поможет запечатлеть самые значимые даты и события.
Профессиональный фотограф в Москве готов предложить вам уникальные услуги, включая [url=https://moscowfocus.ru/]фотограф виктория[/url].
Важно заранее обсудить ваши идеи и пожелания с фотографом, чтобы получить именно тот результат, который вы ожидаете
ремонт накопительных водонагревателей [url=http://www.fix-boiler-moskva.ru]https://fix-boiler-moskva.ru/[/url]
[url=][/url]
Если вы ищете удобный и быстрый способ получить напитки, воспользуйтесь услугой [url=https://alcopushkino.ru/]алкоголь доставка[/url], которая работает без выходных и перерывов, чтобы любой вечер или праздник был полон радости и хорошего настроения.
обеспечивает быструю и безопасную покупку алкогольных изделий. Эта услуга стала неотъемлемой частью современной жизни, особенно среди молодого населения . Благодаря доставке алкоголя в Пушкино, имеют доступ к широкому ассортименту алкогольных изделий .
Доставка алкоголя в Пушкино проводится компаниями, которые заботятся о качестве обслуживания . Компании, предоставляющие эту услугу, стремятся обеспечить высокий уровень обслуживания и удовлетворить потребности каждого клиента . Это позволяет им конкурировать с другими компаниями и привлекать новых клиентов .
Преимущества доставки алкоголя в Пушкино включают в себя возможность выбора из широкого ассортимента напитков и быструю доставку . Доставка алкоголя помогает избежать пробок и длинных очередей в магазинах. Благодаря этому сервису, люди могут расслабиться и наслаждаться своим любимым напитком без хлопот .
Доставка алкоголя в Пушкино также обеспечивает безопасность и анонимность, что важно для многих людей . Компании, которые занимаются доставкой, гарантируют подлинность и качество продаваемых изделий .
Заказать доставку алкоголя в Пушкино можно через интернет или по телефону, что делает процесс простым и удобным . Для начала, следует тщательно изучить условия доставки и оплаты. Затем, может оставить комментарий или специальные инструкции для курьера.
После подтверждения заказа, осуществляет оперативную обработку и отправку товара, гарантируя его сохранность . Курьер гарантирует, что алкогольные изделия будут доставлены в целости и сохранности .
Будущее доставки алкоголя в Пушкино включает в себя расширение ассортимента предлагаемых продуктов и улучшение качества обслуживания . Компании, занимающиеся доставкой, сотрудничают с известными брендами для того, чтобы предложить эксклюзивные напитки. Это даст им возможность повысить уровень обслуживания и качество доставки .
Доставка алкоголя в Пушкино станет еще более доступной и удобной, с развитием мобильных приложений и онлайн-платформ . В будущем, будут иметь возможность оценить качество и разнообразие доставляемых продуктов .
Для жителей Мытищ доступна [url=https://alcomytishi.ru/]алкоголь 24[/url], что делает возможным получение напитков прямо на пороге собственного дома.
набирает популярность среди жителей и гостей города. Это связано с растущим спросом на быструю и качественную доставку. За счет увеличения числа компаний, предлагающих такие услуги жители Мытищ могут получить алкогольные напитки в кратчайшие сроки .
В этом контексте интернет-магазины и компании по доставке алкоголя играют ключевую роль. Они предлагают разнообразные позиции и акции , что делает процесс выбора и получения напитков максимально комфортным для клиентов. Благодаря применению маркетинговых стратегий и продвижения в социальных сетях, доставка алкоголя в Мытищах становится нормой жизни .
Доставка алкоголя в Мытищах предлагает множество преимуществ . Во-первых, основным достоинством является быстрота доставки, поскольку есть возможность совершать покупки без выхода из дома . Во-вторых, получение выбранных напитков прямо на порог обеспечивает удобство и комфорт .
Кроме того, каталог доступных напитков обычно включает в себя широкий спектр товаров. Это дает возможность выбрать из большего количества позиций . Благодаря конкурентной борьбе между интернет-магазинами , цены на доставку алкоголя в Мытищах корректируются в зависимости от спроса и предложения.
Условия и стоимость доставки алкоголя в Мытищах определяются логистическими возможностями и политикой фирмы. Как правило, пороговый объем покупок для бесплатной доставки составляет определенную сумму, зависящую от политики магазина . Кроме того, период ожидания заказа варьируется и влияются наличием товара на складе.
Некоторые компании применяют скидки на доставку для постоянных клиентов. Это повышает лояльность клиентов и стимулирует повторные покупки . При этом необходимо?ательно изучать информацию о доставке на сайте или в приложении .
Заключая, доставка алкоголя в Мытищах обладает большим потенциалом для развития. Благодаря развитию онлайн-платформ и улучшению качества обслуживания , этот рынок станет еще более конкурентным и привлекательным . В перспективе, можно ожидать появления новых инноваций и улучшений , что еще больше повысит качество услуг .
В связи с этим, фирмы, предоставляющие такие услуги должны совершенствовать свою стратегию и тактику . Это даст возможность эффективно развивать свой бизнес. Благодаря совместным усилиям всех участников рынка , доставка алкоголя в Мытищах будет продолжать удовлетворять растущим потребностям клиентов .
Мы предлагаем [url=https://alcoroyal.ru/]доставка алкоголя москва 24/7[/url] с оперативной и точной доставкой по Москве и области.
Доставка алкоголя становится все более популярной услугой в современном мире. Это связано с тем, что Многие предприятия предлагают услуги доставки алкоголя, что делает ее более доступной для широкой аудитории.
Люди могут заказать алкоголь онлайн или через мобильное приложение, и он будет доставлен прямо к их двери.
Это позволяет людям заказать алкоголь в любое время и в любом месте, и он будет доставлен прямо к их двери.
Доставка алкоголя также позволяет людям сэкономить время и силы, и избежать долгих очередей и парковки.
У нас вы найдете актуальные [url=https://moykaterinburg.ru/shinomontazh/]шиномонтаж расценки[/url], которые помогут вам с выбором услуг в нашем сервисе.
Таким образом, вы сможете найти оптимальное предложение, где цена будет соответствовать качеству.
Для тех, кто ищет удобный способ получить свой любимый напиток, [url=https://alcobalashiha.ru/]доставка алкоголя балашиха 24 часа[/url] становится идеальным решением.
становится все более популярной услугой среди жителей города. Это связано с тем, что люди становятся все более занятыми, что не позволяет им лично покупать алкоголь . Компании, занимающиеся доставкой алкоголя, имеют обширный выбор алкогольных напитков .
Доставка алкоголя в Балашихе осуществляется круглосуточно , что очень удобно для заказчиков . Заказ можно сделать через интернет , что облегчает процедуру заказа.
Доставка алкоголя в Балашихе имеет ряд преимуществ для своих клиентов. Одним из основных преимуществ является быстрота доставки, что имеет большое значение для заказчиков . Кроме того, доставка алкоголя гарантирует целостность продукции , что важно для поддержания качества продукции .
Доставка алкоголя в Балашихе также позволяет клиентам экономить время , что может быть использовано более продуктивно. Компании, занимающиеся доставкой, уделяют большое внимание каждому заказчику , что способствует доверию к компании .
Заказать доставку алкоголя в Балашихе relatively просто. Для начала необходимо выбрать компанию, которая занимается доставкой , что можно сделать по рекомендациям . После выбора компании следует перейти на сайт и просмотреть имеющийся выбор .
Затем нужно разместить заказ, что можно сделать по телефону . После оформления заказа будет произведена оплата , что может быть осуществлена разными методами. Компания обеспечит быструю доставку.
Доставка алкоголя в Балашихе является весьма востребованной услугой . Она дает возможность не тратить время, дает доступ к обширному ассортименту и гарантирует качество напитков . Компании, занимающиеся доставкой, стремятся повысить качество обслуживания, что способствует развитию рынка .
В заключение, доставка алкоголя в Балашихе является услугой с большим потенциалом. Ее можно сделать заказ без особых усилий, и она предоставляет множество преимуществ для клиентов. Таким образом, доставка алкоголя будет и дальше совершенствоваться.