A Honda Civic EK facelift involves upgrading the front and rear ends of a 1996–2000 Civic with parts from the 1999–2000 models, including headlights, bumpers, and grille, to achieve a sleeker, more modern JDM look.
Brief History of the EK Civic (1996–2000)
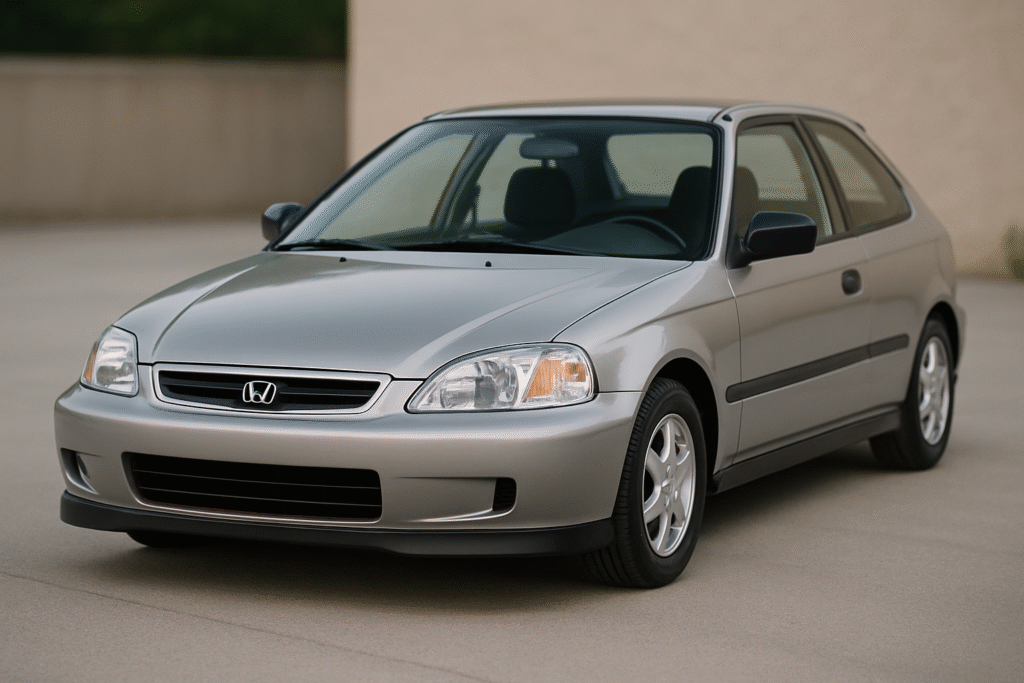
When Honda released the sixth-generation Civic — known as the EK — between 1996 and 2000, it instantly resonated with drivers around the world. Compact, reliable, and surprisingly tunable, the EK Civic became a platform of choice for daily drivers and performance enthusiasts alike.
Over the years, its timeless design and legendary VTEC engine options turned it into a cult classic, especially among younger tuners and the JDM scene.
Popularity Among Tuners and Honda Tech Enthusiasts
The Honda Civic EK isn’t just a car — it’s a canvas. From street builds to track-focused monsters, this model’s flexibility makes it a favorite for customization.
Here’s why tuners still flock to the EK:
-
Lightweight chassis with excellent handling potential
-
Highly modifiable engine bay
-
Wide aftermarket support
-
Strong community and parts availability
-
A perfect candidate for JDM face-lift conversions
What Makes a Facelift Upgrade So Desirable?
In the world of Honda tech and JDM culture, aesthetics are everything — and the EK Civic facelift delivers. Whether it’s for a cleaner front end, improved aerodynamics, or simply that authentic JDM EK face-lift conversion look, upgrading to the facelift version can instantly modernize a 25-year-old build.
Tuners especially love the more aggressive headlights, sleeker bumper designs, and the chance to mix USDM and JDM styling elements for a truly custom ride.
🛠 Understanding the EK Civic Facelift
What is a Facelift in Car Modding?
In car culture, a “facelift” refers to design updates made to a model during its production cycle — often to freshen up the look and keep it competitive. In modding terms, a facelift conversion means retrofitting these newer design elements onto an older version of the same car.
For the EK Civic, that typically involves swapping:
-
Front and rear bumpers
-
Headlights and taillights
-
Hood and front grille
-
Fenders (for proper alignment)
This facelift mod has become so popular that “Honda Civic front end swap” is a common search term among Civic owners looking to transform their rides.
Differences Between Pre-Facelift and Facelift EK Models
Headlights, Bumpers, Grille, Fenders
-
Pre-Facelift (1996–1998): Softer, more rounded headlights with a conservative bumper design.
-
Facelift (1999–2000): Sharper, more angular headlights, a redesigned bumper with larger air intakes, and a slimmer, more aggressive grille.
-
Fenders: Slightly altered to fit the facelift headlights and bumper perfectly.
Upgrading these parts gives the car a sleeker, more aggressive front-end appearance — a key reason why the Honda Civic facelift compatibility is in such high demand.
Interior Tweaks and Tech Upgrades
While most changes were external, facelift models also featured minor interior updates:
-
Revised climate control dials
-
Updated seat fabric and patterns
-
Optional CD players and minor trim upgrades
While subtle, these changes added a more modern feel to the cabin, enhancing both looks and functionality.
Compatibility Considerations (USDM vs JDM)
Before rushing into a Honda Civic front end swap, it’s critical to understand the difference between USDM (United States Domestic Market) and JDM (Japanese Domestic Market) EK models.
Key Compatibility Notes:
-
Mounting Points: Some JDM parts may require slight modifications to bolt onto USDM EKs.
-
Lighting: JDM headlights are typically designed for right-hand-drive setups — adjustments may be needed for visibility and legality in left-hand-drive regions.
-
Fitment: Fender and bumper alignment may require trimming or adjustment if mixing parts from different regions.
Still, many enthusiasts embrace these challenges for the end result: a truly authentic JDM EK Civic face-lift conversion.
✅ Final Thoughts: Is the EK Civic Facelift Worth It?
Absolutely — if you’re looking to breathe new life into your classic Civic, a facelift upgrade is one of the best visual mods you can do. Not only does it modernize the car’s appearance, but it also helps your build stand out in a sea of stock Civics.
Whether you’re after a full EK Civic face-lift conversion or just upgrading a few key parts, this mod blends style, performance, and nostalgia in one sleek package.
🧰 Complete Honda Tech EK Civic Facelift Parts List
Upgrading your EK Civic to the facelift version isn’t just about the look — it’s about precision, fitment, and authenticity. Whether you’re aiming for a full EK Civic face-lift conversion or a partial swap, having the right parts is essential.
Here’s a comprehensive breakdown of everything you’ll need.
Exterior Body Parts
A proper facelift conversion starts with the front end swap. These are the key components:
-
Facelift Front Bumper: More aggressive and aerodynamic than the pre-facelift version.
-
Facelift Grille: Slimmer design; often comes in honeycomb or mesh style (OEM or aftermarket).
-
Facelift Headlights: Sharper, more angular — these are the defining features of the 99–00 EK look.
-
Front Fenders: Slightly reshaped to align with the updated headlight contour and bumper.
Pro Tip: Use all matching facelift components to ensure seamless fitment — especially when mixing USDM and JDM parts.
Interior Upgrades
While less obvious, facelift EK Civics also came with subtle but meaningful interior enhancements:
-
Dashboard Swaps: JDM dashboards sometimes offer better materials or RHD configurations for true JDM feel.
-
Gauge Cluster Upgrades: Digital speedometers or higher redline clusters from SiR or Type R models.
-
Center Console: Updated for better aesthetics and functionality (e.g., cup holders, storage layout).
These upgrades elevate your driving experience and give your cabin a refreshed, factory-modern look.
Lighting and Electronics
Lighting plays a massive role in achieving the full JDM EK Civic facelift effect. Here’s what to look for:
-
Facelift Tail Lights: Feature a cleaner lens layout and often come in a red/clear combo for the 99–00 style.
-
Wiring Harnesses: Necessary when upgrading to facelift lights — helps match plug configurations.
-
Indicators & Side Markers: Updated styling and improved visibility over the pre-facelift versions.
Reminder: Double-check compatibility if importing JDM parts for Honda Civic models — harnesses and bulb types may vary.
OEM vs Aftermarket Parts Comparison
Should you go with OEM JDM parts or opt for aftermarket replicas? Here’s a quick breakdown:
| Feature | OEM JDM Parts | Aftermarket Parts |
|---|---|---|
| Fit & Finish | Perfect fit, factory finish | Varies by brand; may need adjustments |
| Authenticity | 100% authentic JDM look | Can mimic the style but not exact |
| Durability | Long-lasting OEM quality | Some parts may be lower quality |
| Cost | Higher upfront cost | Budget-friendly options available |
✅ Example: A complete OEM conversion often includes Honda Japan’s original headlights, bumper, grille, and taillights — ideal for purists wanting that showroom-correct look.
🛒 Best Sources to Buy EK Civic Facelift Parts
Getting your hands on authentic Honda tech parts or reliable aftermarket components is easier than ever — if you know where to look.
Trusted Online Stores (e.g., eBay, JDM-specific retailers)
-
eBay Motors: Great for hard-to-find OEM or used parts. Look for sellers with strong ratings.
-
JHPUSA, Password:JDM, and Nengun: Specialize in JDM parts for Honda Civic, including full facelift kits.
-
Amazon: Good for universal aftermarket parts but always check reviews and fitment.
✅ Search Tip: Use terms like “buy EK Civic parts online” or “99–00 Civic facelift conversion kit” for best results.
Honda Tech Forums and Community Marketplaces
Online communities are goldmines for trusted deals, knowledge, and rare parts:
-
Honda-Tech.com: One of the largest forums for Honda builds. Their classifieds section is active and trustworthy.
-
Civic-EG.com and EK9.org: Cater specifically to EK platforms and often list EK Civic forum part swaps.
-
Facebook Marketplace & Groups: Look for local groups like “EK Civic Buy/Sell/Trade” in your region.
These platforms also offer insights into fitment, installation help, and user reviews.
Local Junkyards and Import Shops
If you’re lucky, local junkyards or JDM import shops may stock authentic facelift components:
-
Auto recyclers with imported front clips are ideal for full conversions.
-
Local JDM importers often carry used parts from Japanese auctions or direct shipments.
Bonus Tip: Always inspect used parts for damage or poor repairs — especially headlights and bumpers which are often prone to wear.
🧩 Final Thoughts: Getting the Right Parts for Your EK Facelift
Whether you’re building a show car or just refreshing your ride, having the right parts is half the battle. From sourcing OEM pieces to finding budget-friendly aftermarket options, your choices will define the final look.
Take your time to compare, research part numbers, and connect with the Honda tech community to ensure every piece fits just right.
📣 What Part Are You Swapping Next?
Let us know in the comments which facelift component you’re upgrading first — or drop your favorite trusted seller for other readers! Want help picking coilovers or performance upgrades? Explore our EK suspension tuning guide or read next: Top 5 JDM Mods for Civic Owners.
🔧 How to Install EK Civic Facelift Parts (Step-by-Step Guide)
Converting your EK Civic to the facelift model isn’t just about slapping on new parts. To ensure a clean, OEM-style look, you’ll need the right tools, a step-by-step plan, and a little patience.
Tools You’ll Need for the Conversion
Before you get started, gather these essentials:
-
Socket wrench set (metric sizes)
-
Flathead and Phillips screwdrivers
-
Plastic pry tools
-
Jack stands or ramps
-
Panel clips and zip ties
-
Trim remover
-
Torque wrench (optional but helpful)
Tip: Label and organize all screws and clips during removal — it’ll save you serious time during reassembly.
Step-by-Step Installation for Front-End Components
Here’s how to do a clean Honda Civic front end swap:
-
Remove OEM Front Bumper
-
Unbolt the fender liners, splash guards, and bumper bolts (underneath and in the wheel wells).
-
-
Uninstall Headlights and Grille
-
Carefully unplug the wiring and unscrew the headlights and grille.
-
-
Remove the Front Fenders (If Swapping)
-
Unbolt from inside the engine bay and wheel arches. Use care around the A-pillar mounting points.
-
-
Install Facelift Fenders and Headlights
-
Ensure alignment before fully tightening. Some adjustments may be needed.
-
-
Mount New Grille and Front Bumper
-
Test-fit first. Use new clips or brackets as needed for secure mounting.
-
Bonus Tip: Always do a test fit before painting to confirm alignment and gap consistency.
Wiring Tips for Lights and Indicators
-
Use facelift-specific harnesses or splice your OEM harness carefully.
-
Test all connections before reassembling panels.
-
For JDM headlights, ensure beam direction complies with local driving laws (LHD vs RHD differences).
-
Upgrade to LED bulbs if desired — just ensure proper resistor usage to avoid hyper-flashing.
✅ Case Study:
Facelift Journey: How One Enthusiast Converted His ’97 EK Hatch to a Full ’99 JDM Front End
“I sourced OEM JDM parts from a seller in Osaka and shipped everything to California. The hardest part was getting the fender and bumper alignment right — but once everything clicked, it looked like a factory ’99 hatch. Took me two weekends with some help from friends and YouTube tutorials.” — @EKDreamBuild (Instagram)
🚫 Common Mistakes to Avoid When Doing a Facelift Swap
Mixing Incompatible USDM and JDM Parts
While many components can be interchanged, blindly mixing USDM and JDM parts can cause issues like:
-
Misaligned panels
-
Wrong mounting points
-
Wiring mismatches
Stick with a consistent setup (all USDM or all JDM) where possible.
Ignoring Proper Fitment and Alignment
Too many DIY swaps end up with:
-
Uneven headlight gaps
-
Sagging bumpers
-
Hood misalignment
Take your time with adjustments. Fitment is what separates clean builds from hack jobs.
Cheap Aftermarket Parts vs Quality OEM
Sure, that $80 bumper might seem like a good deal — until it cracks during install or doesn’t line up.
Invest in quality aftermarket brands or go OEM if budget allows. You’ll save time, stress, and money in the long run.
💸 Cost Breakdown: How Much Does an EK Civic Facelift Conversion Cost?
Let’s talk numbers — because not all facelift swaps are priced equally.
Budget Build vs Premium JDM Conversion
| Build Type | Approximate Cost | What You Get |
|---|---|---|
| Budget Build | ~$800–$1,000 | Aftermarket bumper, headlights, DIY fitment |
| Premium JDM OEM | ~$2,000–$2,500+ | Genuine JDM parts, paint, pro install |
DIY vs Professional Installations
-
DIY Install: $0–$200 (depending on tools needed)
-
Shop Install: $500–$1,000 (varies by labor rates)
Going DIY saves money, but professional shops can ensure perfect alignment and wiring.
Hidden Costs (Shipping, Paint, Labor)
Don’t forget:
-
Shipping (especially from Japan): $100–$500+
-
Painting and color matching: $300–$700
-
Extra hardware (clips, brackets, sealant): $50–$100
✅ Example:
A full OEM JDM EK Civic face-lift conversion including parts, paint, and install can easily exceed $2,500+, while a well-sourced budget build can be done under $1,000 if you’re hands-on.
🚗 Showcasing the Best EK Civic Facelift Builds
Featured Instagram or YouTube Builds
-
@EK_Obsession – Showcasing a fully restored SiR with Spoon mirrors and a genuine JDM front.
-
YouTube: “EK Facelift Build – Start to Finish” by GarageBuiltDreams – A step-by-step video tutorial with amazing results.
Community Favorites from Honda Tech Forums
-
“My 99 Front on a 97 Hatch” Thread – Thousands of views and replies documenting the journey.
-
Forum Builds Section – Offers part lists, wiring guides, and real-user reviews.
These threads are treasure troves for anyone planning a Honda tech EK facelift.
Before and After Gallery
Before: Soft, rounded front with basic USDM lights.
After: Sleek, sharp JDM-style face with a commanding road presence.
Want your EK build featured? Tag us or drop a comment below!
🏁 Final Thoughts – Is the EK Facelift Worth It?
Performance vs Aesthetic Value
While it doesn’t add horsepower, a facelift gives your Civic a new identity. It’s the kind of mod that draws attention — even at a crowded meet.
Investment Return in the Car Mod Market
Well-executed EK builds with OEM JDM parts retain value better than stock ones. Some even see appreciation in value when sold to collectors or fellow enthusiasts.
Is It Just for Looks or Function Too?
Mostly visual — but:
-
Improved headlight design = better nighttime visibility.
-
Aerodynamic bumpers = slight handling improvements at speed.
But let’s be honest — you’re doing it for the JDM cred and style points, and that’s totally valid.